Tile Installation Tool Buying Guide for Floors, Walls, and Cleaner Tile Layouts
Tile installation tools are easy to underestimate because they do not seem as important as the tile itself, the mortar, or the finished pattern. But many frustrating tile jobs go wrong not because the tile was poor, but because the supporting tools made it harder to keep lines straight, mortar consistent, and surface height controlled. A weak trowel can feel sloppy, a poorly chosen spacer system can make layout drift, and a leveling setup that looked convenient in the package can slow the job instead of calming it down. The right tool set is not about buying every accessory in the aisle. It is about choosing the tools that reduce the most common installation mistakes for the type of tile, room, and layout you are actually doing. This guide explains how to choose tile installation tools based on tile size, surface type, layout complexity, and workflow so the project stays more controlled from the first row to the last cleanup pass.
Which Installation Problems You Actually Need to Solve
The first tile installation tool decision is not whether to buy a kit or assemble tools individually. It is understanding what part of the installation is most likely to go wrong. Different tools solve different problems. Some help control mortar spread. Some help hold joint spacing. Some help reduce lippage and keep adjacent tile faces more even. If you buy without that problem-first mindset, it becomes easy to end up with tools that look helpful but do not actually reduce the mistakes your project is most likely to produce.
Wall tile and floor tile often call for different priorities. On walls, layout control and tile slippage can become bigger concerns because the material is being placed on a vertical surface and small spacing inconsistencies are easy to see at eye level. On floors, surface flatness, edge alignment, and the cumulative effect of repeated rows usually matter more. This does not mean the tools are completely different, but it does mean the weighting changes. A wall backsplash may reward careful spacers and manageable trowel work more than a robust leveling system. A large-format floor installation may feel the opposite.
Tile size matters too. Smaller tile can be more forgiving in one sense because each piece is easier to place, but it can also make joint consistency more visually important because there are simply more joints. Larger tile reduces joint count but tends to place more pressure on flatness and leveling because any small height difference becomes easier to feel underfoot or catch with light across the surface. The right installation tools should match the dominant visual risk of the tile size you are using.
Surface condition also shapes which tools earn their keep. If the substrate is already quite flat and the room layout is straightforward, simpler tool choices may be enough. If the surface has small irregularities, the room has awkward transitions, or the layout includes longer runs and visible sight lines, more attention to leveling and repeatability becomes worthwhile. Good tool buying in this category is really about reducing the project’s actual points of failure rather than buying by habit.
Another useful question is whether the project is more likely to fail visually or mechanically. A visually poor tile job often shows uneven joints, drifting alignment, inconsistent spacing, or lippage. A mechanically poor tile job may stem from weak mortar coverage or poor bedding, which installation tools also influence. Trowels, leveling clips, spacers, and hand-setting tools all affect whether the tile sits where it should and whether it bonds the way it should. That is why these tools matter more than their small size suggests.
Choose tools according to the installation problem most likely to happen, not just by what looks standard in a tile aisle.
Give more weight to spacing control and slippage management on visible wall tile layouts.
Give more weight to flatness and lippage control on larger floor tile installations.
Let tile size and substrate condition determine how much tool support the layout really needs.
A helpful mindset is to think of tile installation tools as error-reduction tools rather than accessories. If a tool does not clearly lower the risk of one of the project’s likely mistakes, it may not deserve space in the workflow. That approach keeps the tool list practical instead of bloated.
Low-regret buying in this category starts by knowing whether you are trying to control mortar, joint spacing, height alignment, or all three. Once that is clear, the field narrows quickly.
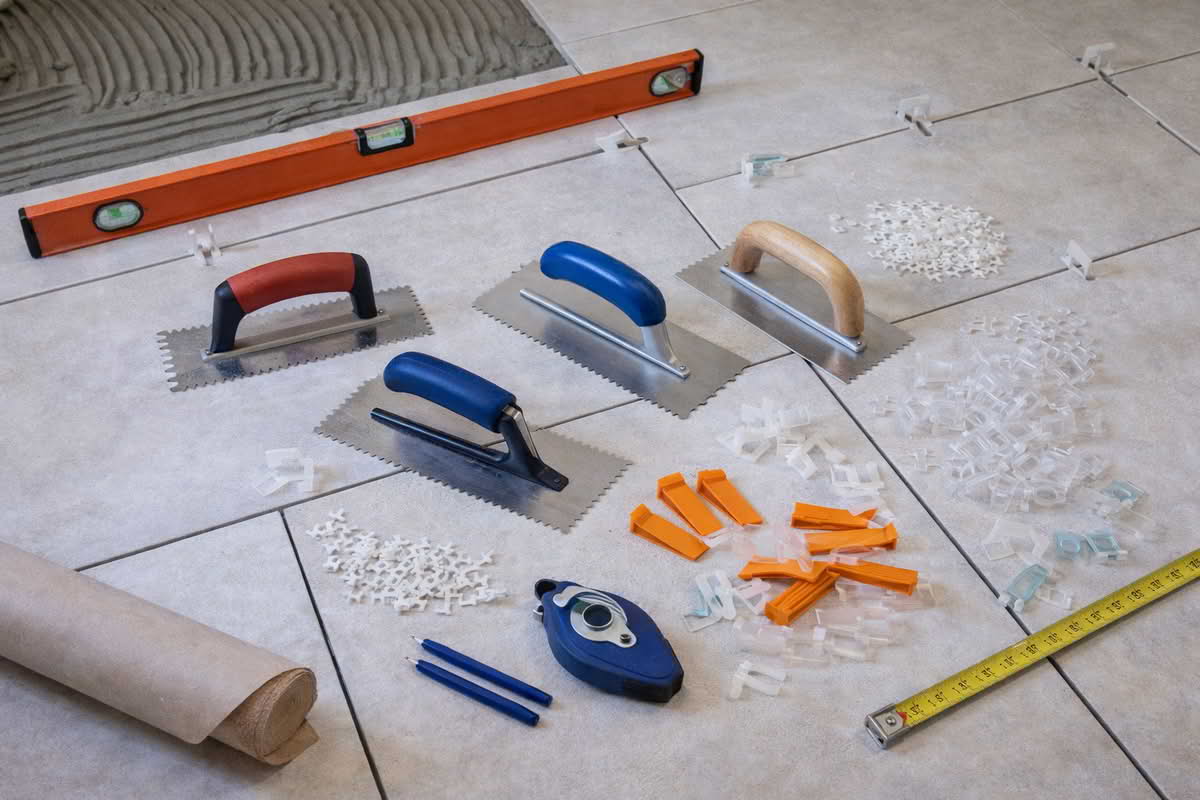
Trowels, Spacers, and Leveling Systems
Once the main installation risks are clearer, the next step is choosing the tools that directly influence tile placement. The three biggest categories here are trowels, spacer systems, and leveling systems. They are related, but they solve different parts of the same problem. This is why a good-looking starter bundle can still disappoint if one of those parts is poorly matched to the tile or the layout.
Tile trowel sets matter because mortar coverage starts with the notch pattern and the feel of the tool in hand. A trowel that is too small for the tile can leave inconsistent coverage and make bedding less predictable. One that is too large for the job can create excess mortar mess and unnecessary squeeze-out. Beyond notch size, handle comfort and blade rigidity also matter because tile setting is repetitive work. A trowel that feels sloppy or tiring can quietly reduce consistency as the project progresses.
Spacer kits help maintain joint width, but not all spacer choices solve the same layout problem. Some projects need simple, reliable separation between tiles. Others need a system that is easy to remove cleanly and easy to keep upright during rapid installation. The more visible and geometric the layout, the more spacing consistency matters. A forgiving utility wall may tolerate small variation. A backsplash with strong pattern lines or a floor that runs through multiple sight lines usually will not. In those cases, a better spacer system can make a bigger visual difference than first-time tilers often expect.
Tile leveling systems are most useful when tile size, substrate flatness, or finish expectations make lippage a real concern. They are especially relevant with larger format tile because a small edge height difference becomes more noticeable as the tile face gets bigger. A leveling system does not replace surface prep, and it does not automatically make a poor layout good. What it can do is help hold adjacent tiles into a more even plane while the mortar cures, which reduces one of the most frustrating finish defects in larger tile work.
This is where many buyers overcorrect. After reading about lippage, they assume every tile job needs a full leveling system. In practice, smaller wall tile or modest-format installations on a well-prepared surface may not benefit enough to justify the extra process. Conversely, skipping leveling support on a larger-format floor because it seems optional can create a project that feels difficult to recover once several rows are already set. The right choice depends on the tile size and how exact the finished plane needs to be.
Starter kits can be useful when they combine these categories sensibly, but they should be judged as working systems rather than as part counts. A kit with too many weak accessories is less helpful than a smaller set with a good trowel, reliable spacers, and a leveling system that actually fits the tile size and project scope. The right tile installation tool set is about coherence, not abundance.
Tile installation tools are most useful when they work together to control mortar coverage, joint spacing, and tile height rather than trying to solve only one part of the layout problem.
Choose trowels by tile size and mortar handling needs rather than as one-size-fits-all tools.
Choose spacer systems according to how visible and unforgiving the joint layout will be.
Choose leveling systems when tile format and finish expectations make lippage a realistic risk.
Judge bundled kits by the usefulness of the core tool categories, not by the total number of included pieces.
A useful way to frame the decision is to ask whether the project needs placement control, visual spacing control, or plane control most urgently. Trowels help with placement and coverage. Spacers help with visual rhythm. Leveling systems help with plane control. Good buying makes sure the strongest support goes toward the project’s most vulnerable area.
In long-term ownership, the most useful tile tools are often the ones that reduce repeated correction. A better trowel or better spacer setup can save more frustration than a long list of secondary accessories that never meaningfully affect the result.
Starter Kits, Workflow, and Low-Regret Tool Selection
Tile installation tools should also be judged by how well they support the pace and rhythm of the project. A tool can be technically correct and still be the wrong household choice if it interrupts workflow, creates cleanup burden, or demands more setup discipline than the project really needs. This is especially true for DIY tilers, where the work already includes measuring, cutting, mixing, spreading mortar, placing tile, checking alignment, and cleaning joints as the job progresses.
Starter kits appeal for obvious reasons. They reduce shopping time and create the feeling that the basic workflow has been covered in one purchase. That can be genuinely useful for first-time tilers who do not want to guess at every tool category separately. But starter kits vary widely in how balanced they are. Some include a decent spread of useful basics. Others overemphasize cheap accessories while underdelivering on the trowel or the tile-control tools that actually matter most during installation.
Workflow fit matters because tiling punishes clutter. Too many partially useful tools spread around the room can make the process feel slower and less confident. A tighter set of genuinely helpful tools usually performs better than a large kit where only half the items ever leave the box. The right tool selection should simplify decisions while the tile is being set, not create more of them.
Cleanup is part of the same issue. Trowels need to clean reasonably well. Spacer systems need to be removable without turning joint cleanup into a separate chore. Leveling systems need to be manageable enough that they help more than they complicate. Some tools look useful until the mortar starts drying and the project pace depends on staying ahead of cleanup. That is when awkward tools reveal themselves quickly.
Project scale should drive how much you invest in tool refinement. A single small backsplash may not justify a broad installation kit if the tile is small, the substrate is good, and the layout is simple. A larger floor or multi-room tiling job can justify more deliberate tool choices because the benefits repeat across many placements. This is why low-regret buying often means choosing for repetition. If a tool improves one hundred placements, it matters more than a tool that solves one minor inconvenience once.
There is also a storage question. Tile tools are not always one-project tools. A good trowel, a useful spacer system, or a well-matched leveling setup can serve across several future repairs or installations. But that long-term value only matters if the tools are practical enough to keep and remember using. Bulky, inconsistent, or low-quality tools tend to become dead storage. Well-chosen basics remain genuinely reusable.
Choose starter kits only when the core installation tools are meaningfully useful, not just when the bundle looks complete.
Prefer a smaller working set over a cluttered collection of low-impact accessories.
Give more weight to tool quality when the project includes many repeated placements or larger visible areas.
Think about cleanup and reuse because tile tools that are annoying to manage often go underused later.
One helpful decision frame is to ask whether the tool speeds clarity or only adds options. A good tile installation tool makes the next step more obvious. A weak one gives you one more thing to manage while the mortar clock is already running. That is why practical workflow fit matters more than having every imaginable accessory.
The long-term low-regret choice in this category is usually the one that makes placement calmer, spacing more consistent, and cleanup more manageable without turning the room into a staging area for tools that do not meaningfully improve the tile work. When the tool set matches the scale and difficulty of the project, the installation feels more methodical and less reactive.
Final Recommendations — choosing tile tools that reduce the most likely installation mistakes
For most households, the safest approach is to choose tile installation tools by tile size, layout visibility, and substrate demands rather than by the largest starter bundle available. A reliable trowel matched to the tile format, a spacer system that keeps joints consistent, and a leveling system only where lippage risk justifies it will usually do more for the result than a broad assortment of low-impact extras. The key is to buy for the placement problems you are most likely to face repeatedly, not for theoretical edge cases.
Choose tile trowels by mortar coverage needs and handle control, not just by included bundle count.
Choose spacer systems that support the level of visual precision the layout actually demands.
Choose leveling systems for larger-format or less forgiving tile projects where plane control matters.
Judge starter kits by whether the core tools genuinely improve workflow, not by how many accessories they include.
The long-term low-regret decision in this category is to treat tile installation tools as layout-control tools rather than as optional add-ons. When the trowel, spacer system, and leveling approach match the room and the tile, the installation becomes easier to repeat cleanly and harder to throw off course. That is what makes a tile tool purchase worthwhile: not that it fills the toolbox, but that it helps the finished surface look straighter, flatter, and more deliberate.