Drywall Sander Buying Guide for Smoother Finishing and Better Dust Control
Drywall sanding sounds like the easy part of wall repair until the room fills with dust, the patch still looks uneven, and the surface ends up flatter in the wrong places than where it actually needed refinement. Many buyers choose a drywall sander by assuming bigger or more powered means better, but the real question is how much sanding control, reach, and dust management the job requires. A small repair near a doorway does not need the same tool as ceiling seam work or repeated room refreshes. Some sanders are better for controlled blending. Others are better for broad wall coverage. Some reduce dust noticeably, while others save time only if you are prepared for heavier cleanup afterward. This guide explains how to choose a drywall sander based on repair scale, finish sensitivity, and workflow so sanding becomes more predictable and less likely to create new cosmetic problems.
Sander Type and Repair Scale
The first drywall sander decision is not motor power or kit size. It is tool category. Different sanding tools solve different drywall problems, and the right choice depends heavily on whether you are refining a small patch, smoothing broad seams, working overhead, or trying to reduce ladder time. Buyers often go wrong by buying for the largest imaginable project rather than the work they are most likely to do repeatedly.
Manual pole sanders remain the most practical starting point for many homeowners because they handle wall and ceiling prep without requiring electricity, hoses, or bulky storage. They are especially useful when the main challenge is reach rather than aggressive material removal. For example, leveling drywall compound along ceiling lines or knocking down high spots across a wide patch zone often benefits more from steady reach and broad contact than from speed. Pole sanders also tend to keep the sanding process slower and more deliberate, which can actually improve finish quality for less experienced users.
Sanding sponge kits serve a narrower but still important role. They are better for small repairs, corners, transitions near trim, and touch-up blending where a large sanding head would be clumsy. They do not replace a broader drywall sander for larger surfaces, but they often produce lower-regret results on isolated patches because they let you refine exactly the area that needs correction without flattening too much of the surrounding wall. For occasional household repair, this can matter more than coverage speed.
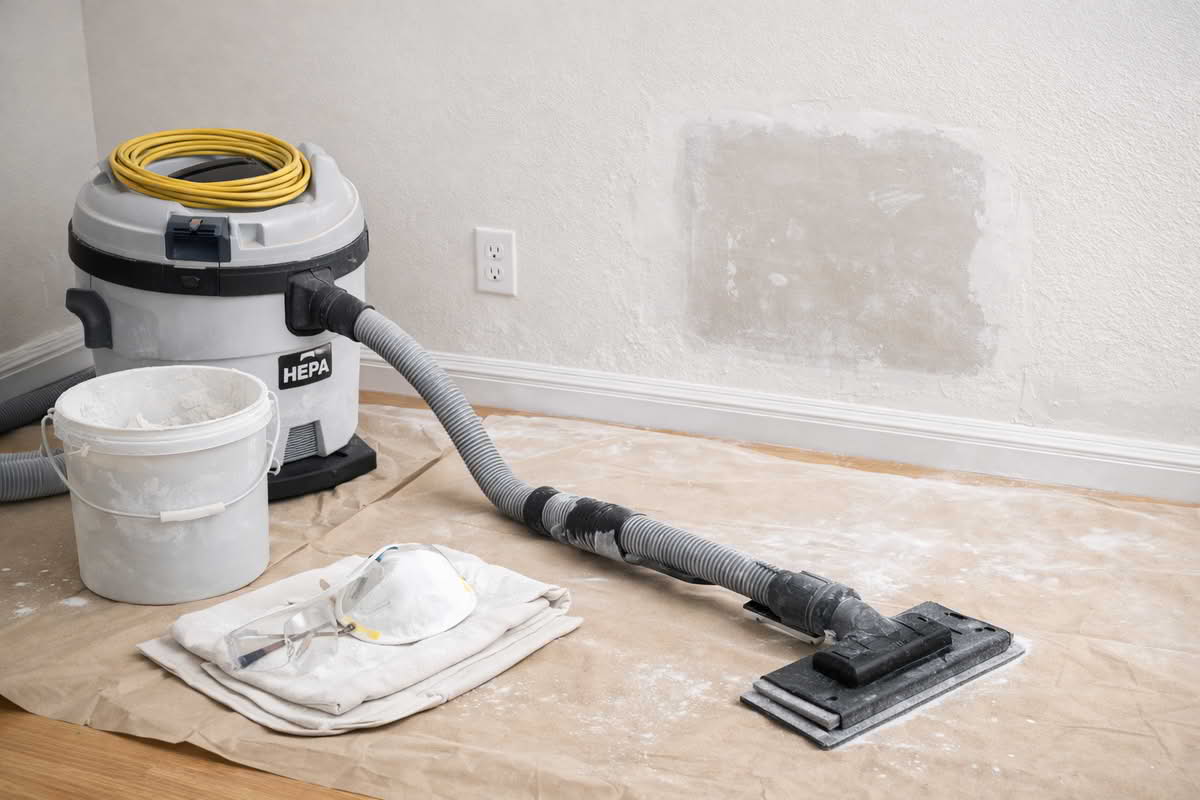
Vacuum-compatible drywall sanders appeal to buyers who already know dust will be the main problem. These tools are especially useful when you expect larger sanding sessions, repeated room work, or interior repairs in spaces where containment matters. Their value is not only cleaner air. It is also better project rhythm. When less dust coats the surrounding area, there is less interruption for wiping, vacuuming, and second-guessing whether the surface is actually smooth or just covered in residue. The tradeoff is that these tools usually make more sense when paired with an appropriate vacuum and when the job size is large enough to justify the added setup.
Compact electric drywall sanders are best understood as productivity tools. They can save effort on larger surfaces and can help on repeated smoothing tasks, especially where wall or ceiling coverage is broad and time matters. But they are not automatically the best choice for homeowners. Power changes the risk profile. A tool that removes compound quickly can also over-sand a patch, flatten texture too widely, or create visible low spots before the user realizes it. For people doing only occasional patch repairs, that efficiency can be harder to control than expected.
The practical question is whether the project is limited by reach, dust, or speed. If reach is the main problem, manual pole sanding may already solve most of it. If dust is the primary frustration, vacuum-oriented systems deserve more attention. If you are repeatedly sanding larger patch zones or finishing several rooms, an electric option may start to make more sense. But buying a powered drywall sander for a handful of small household repairs is often like buying a large shop solution for a minor maintenance problem.
Choose sanding sponges for smaller repairs, corner work, and careful blending near trim or detail edges.
Choose manual pole sanders for ceilings, taller wall sections, and broad smoothing where control matters.
Choose vacuum-compatible sanders when dust reduction is a major part of the buying decision.
Choose compact electric sanders only when project size and frequency clearly justify faster material removal.
Another useful way to think about scale is to separate patch size from sanding area. A small repair can still require a relatively broad sanding zone if the compound was feathered widely. Likewise, a large visible wall may only need light smoothing across a broad area rather than aggressive cutting. The right sander is not necessarily the one that matches the hole. It is the one that matches the finish area.
Low-regret buying in this category usually comes from resisting extremes. Many households do not need the smallest improvised sanding approach or the largest powered solution. They need a drywall sander that matches the size of the surfaces they actually repair and the level of finish they expect once paint goes back on the wall.
Finish Control and Dust Management
Drywall sanding is not just about removing excess compound. It is about shaping a believable wall surface. That makes finish control more important than raw sanding speed, especially on smooth walls, hallways, and rooms with side lighting that reveals every transition. A drywall sander that removes material quickly but makes it harder to judge pressure and flatness can create more cosmetic work rather than less.
Manual sanding tools often outperform powered ones on finish sensitivity for a simple reason: they force a slower pace. Slower sanding gives the user more feedback about when the surface is nearly right and when only minimal refinement is still needed. This is especially valuable on patch edges, skimmed areas, and repaired seams where the goal is not to erase all compound, but to blend it into the surrounding wall plane. Over-sanding is one of the most common drywall finishing mistakes because it creates shallow low spots or exposes tape and paper layers that were not the real problem to begin with.
Powered drywall sanders can absolutely produce good results, but they require more discipline. The user has to manage pressure, movement speed, and dwell time carefully. On wide ceiling seams or repeated larger patch zones, that effort can be worthwhile because the tool reduces labor and improves consistency over distance. But on smaller repairs, power can magnify impatience. A moment of extra pressure in the wrong spot is harder to hide than a few minutes of slower hand sanding.
Dust management is where category differences become much more important. Drywall dust does not merely create cleanup. It affects visibility, surface inspection, and the quality of the next steps. Dust on the wall can disguise remaining ridges until primer reveals them later. Dust on floors, trim, and nearby furniture creates extra work at exactly the stage when most people want to move on to painting. This is why dust control should be treated as part of finish quality, not just comfort.
Vacuum drywall sanders can change the experience significantly when they are set up properly. They reduce airborne dust, keep the work area clearer, and make it easier to inspect the repair as you go. This is especially valuable in occupied rooms, finished homes, and interior jobs where cleanup burden can otherwise overshadow the repair itself. The tradeoff is that vacuum systems add complexity. Hoses, connections, and movement resistance can make the tool feel less nimble, especially in tighter spaces or on short-duration repairs.
Sanding sponge kits and manual pole tools usually create more free dust, but they can still be sensible choices when the project is small enough that containment and cleanup remain manageable. In those cases, the added simplicity and control may be more valuable than maximum dust capture. It depends on the room, not just the tool. A lightly occupied garage repair and a hallway patch outside bedrooms do not ask for the same balance.
Drywall sanders should be judged not only by how fast they smooth compound, but by how well they preserve finish control and reduce cleanup during the repair workflow.
Abrasive choice also interacts with sander type. A well-matched sanding head and abrasive can keep removal controlled and predictable, while a poorly matched one can clog, drag, or encourage extra pressure. This matters because drywall finishing is rarely a brute-force task. Predictable cutting is usually more valuable than aggressive cutting, particularly once the surface is already close to acceptable.
Prioritize finish control when sanding visible wall repairs, seams, and smooth surfaces.
Prioritize dust management when working indoors, in occupied rooms, or across larger sanding areas.
Use powered sanding only when you can maintain steady movement and avoid lingering in one spot.
Treat dust control as part of paint-ready surface quality, not just as a comfort feature.
One helpful decision frame is to ask whether the repair is more likely to fail from uneven sanding or from messy cleanup. In some rooms, cosmetic over-sanding is the main risk. In others, dust migration and room disruption are the bigger problem. The best drywall sander is the one that addresses the dominant failure point of the actual job.
In long-term use, the most satisfying drywall sanding tools tend to be the ones that make the repair easier to judge accurately. If you can see the surface clearly, feel what the tool is doing, and stop sanding before you create damage, the tool is probably serving the project well.
Fatigue, Storage, and Real-World Workflow
A drywall sander should also be judged by how it fits into the rest of the repair process. Sanding is usually not a stand-alone job. It comes after patching, drying, checking edges, and often a second or third minor correction pass. That means the best sander is not necessarily the one that seems most impressive in isolation. It is the one that still feels practical after the room has already required setup, compound work, drying time, and cleanup planning.
Fatigue matters more than many buyers expect. Ceiling sanding, upper wall smoothing, and repeated feathering passes can tire shoulders and wrists quickly. Manual pole sanders reduce ladder dependence and improve reach, but they can still become tiring if the head does not move predictably or if the tool feels awkwardly weighted. Electric sanders reduce some physical labor, yet their weight, motor vibration, and hose drag can introduce a different kind of fatigue. This is why “less effort” on paper does not always translate into easier real-world use.
For homeowners, storage is often a practical filter. Compact hand tools and pole sanders are easier to keep in a utility area and easier to grab for occasional fixes. Larger powered drywall sanders, especially those with vacuum components or larger cases, make more sense when wall and ceiling finishing happens often enough to justify the footprint. If the tool is cumbersome to store, it is more likely to stay out of use until a project becomes large enough to feel overwhelming. Simpler tools often win on repeat usability because they create less friction between noticing a wall defect and actually fixing it.
Workflow also depends on how precise the sanding needs to be. Small repairs near trim, corners, or textured transitions usually go better with tools that let you isolate the work area. Broad seam finishing and ceiling blending benefit more from tools that cover distance evenly. Many buyers assume one drywall sander should do both equally well, but that is rarely true. A narrower or more controlled tool often complements a broader sander rather than being replaced by it.
Another overlooked factor is cleanup sequence. A drywall sander that generates heavy dust may demand more wiping, vacuuming, and inspection between passes. A vacuum-compatible system may reduce that burden but add setup and hose management. The better option depends on whether the project is a quick repair or part of a larger room restoration. For small isolated fixes, the fastest total workflow is often the one with the least equipment. For larger interior sanding sessions, equipment that reduces room cleanup often becomes more worthwhile.
It also helps to think about repetition. If you will use the tool for one repair every few months, simplicity and control usually matter more than speed. If you are renovating multiple rooms, patching several damaged walls, or regularly doing drywall finishing work, then reduced labor and better dust capture rise in value. The right drywall sander is often less about the current patch and more about the pattern of future use.
Choose tools that reduce fatigue in the positions where you actually sand most often.
Buy compact, easy-to-store solutions for occasional household repairs and touch-ups.
Buy larger or powered systems when repeated wall and ceiling work makes labor reduction worthwhile.
Think in terms of total workflow time, including setup, sanding, cleanup, and storage.
A good buying test is to ask whether the sander will make you more likely to prep correctly next time. If the tool feels manageable, stores easily, and fits the way you repair walls, it will probably see real use. If it feels oversized, awkward, or burdensome to stage, there is a good chance future repairs will be delayed or done with something less appropriate.
That is why the best drywall sanding setup is often not the one with the biggest feature list. It is the one that makes careful finish work repeatable without turning a normal repair into a larger production than it needs to be.
Final Recommendations — choosing the drywall sander that matches the finish standard of the job
For most households, the safest drywall sanding choice is a controlled system matched to the scale of the repair rather than the most aggressive tool available. Manual pole sanders make sense for broader wall and ceiling work where reach matters, while sanding sponge kits remain useful for smaller patches and finish-sensitive areas. Vacuum-compatible and compact electric drywall sanders become more worthwhile when dust reduction, repeated repairs, or larger sanding sessions are regular parts of the workflow.
Choose sanding sponges for small patch blending, corners, and detail-sensitive areas.
Choose manual pole sanders for ceilings and larger finish zones where broad control matters.
Choose vacuum-oriented sanders when interior dust control is a major part of project success.
Choose powered drywall sanders only when the scale and frequency of the work justify the added complexity.
The long-term low-regret approach in this category is to buy for finish predictability, not just sanding speed. A drywall sander should help you smooth compound cleanly, preserve the shape of the repair, and keep the room manageable enough that the next steps go more smoothly. When the tool matches the surface, the sanding area, and the cleanup reality of the project, wall repairs become easier to blend and much less likely to create new problems after paint goes on.